
Why Monitor VPN Connectivity
If you use a virtual private network (VPN) to establish a connection from one private network to another private network and you need to maintain an optimal level of service delivery via the VPN tunnel, it is essential to set up VPN connectivity monitoring in place. VPN connectivity monitoring helps to keep tabs on VPN connectivity status and troubleshoot VPN-related performance and availability issues.
Dotcom-Monitor Monitoring Solution allows its users to configure VPN connectivity monitoring from within local networks by using Private Agent by Dotcom-Monitor. Private Agent can be installed on a dedicated Windows Server within your local network and used for VPN monitoring. Real-time VPN connectivity monitoring reports received from the Private Agent will be stored in your Dotcom-Monitor account and can be accessed at any time for further analysis. The monitoring reports will help you to identify a baseline for a normal VPN performance and spot any anomalies in the statistics.
To react immediately to VPN connectivity problems, such as a sudden slowdown of the connection or packet losses, you can configure Dotcom-Monitor alerting. In the case of connectivity problems issues in the network, Dotcom-Monitor will automatically generate an error and the corresponding alerts will be sent to the dedicated addresses.
Approaches to VPN Connectivity Monitoring Setup
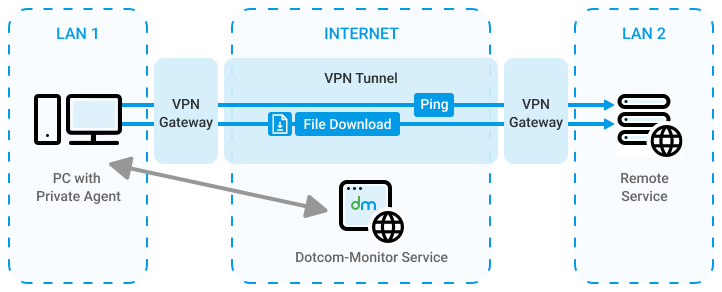
To start with VPN connectivity monitoring, install and configure a Private Agent in your local network where VPN is used to establish the connection.
Once a private agent has been installed in your network, you can continue with the monitoring setup. Generally, to be sure that your VPN connection is available 24/7 and packet loss and latency are at the expected level, you can use either of the approaches that we describe in this article.
The easiest and most straightforward way to set up VPN connectivity monitoring is to configure a Ping/ICMP monitoring task to send ICMP echo requests from your private agent to a target remote service via VPN with the 1 – 5min check frequency. This will allow you to monitor the VPN connection for packet loss and pattern in the latency deviation from the baseline.
The second approach is to configure monitoring of a file download via VPN from the target remote service. The private agent will send HTTP/S requests from your local network to the remote service and download the file using your VPN channel at a specified frequency (once per 3 hours and up to 1 minute). By checking the monitoring results you will be able to monitor the time that is required to download the file from the remote service via VPN at various times of the day and find a pattern in the time deviation.
Configuring VPN Connectivity Monitoring with Dotcom-Monitor
To set up VPN connectivity monitoring you must be logged in to your Dotcom-Monitor account and at least one Private Agent must be installed and configured in your local network.
Ping/ICMP Monitoring
To configure Ping/ICMP monitoring of your VPN tunnel, check the following general steps:
- Create a Ping/ICMP monitoring device as described in the Ping/ICMP Device article of our Knowledge Base.
- On the device edit page, set the Time Validation Threshold to the expected level of VPN latency. If no response is received or the response time exceeds the specified value, the system will generate an error alert.
- Under the Monitoring tab of the edit page, select the corresponding private agent in the Private Agent list.
- Optional: To receive alert notifications on any monitoring errors, set up alerting for the device as described in the Configuring Device Alerting Settings article.
- Save the device.
- Check the Online Report for the monitoring results. Use the Performance and Uptime charts of the report to check the performance and availability of your network.
VPN Monitoring with File Download
To set up VPN connectivity monitoring by downloading a file to your local network from a remote service via VPN, check the following general steps:
- Create an HTTP/S monitoring device as described in the HTTP(S) Device article of our Knowledge Base.
- On the device edit page, specify the file download URL in the URL field. The maximum file size is 50 MB.
- Specify an expected file download time in the Time Validation Threshold field. If no response is received from the target service or the file download time exceeds the specified value, the system will generate an error alert.
- Under the Monitoring tab of the edit page, select the corresponding private agent in the Private Agent list.
- Optional: To receive alert notifications on any monitoring errors, set up alerting for the device as described in the Configuring Device Alerting Settings article.
- Save the device.
- Check the Online Report for a pattern in the file download time.