
An HTTP(S) load test generates concurrent requests to a single URL. It checks the target URL for proper content, errors, and broken links. It supports POST and GET requests, cookies, form submissions, custom headers, password secured sites (basic HTTP/HTTPS authorization as well as cookie/script authorization mechanisms), and timeout thresholds. The HTTP(S) load test supports both IPv4 and IPv6 protocols.
You can convert HTTP(S) request parameters to Context Parameters to pass in values, for example, retrieved from a response of another request within the load test device. You can set up context parameters for the URL, headers, request content (for Post, Put, Patch methods), and the prepare and post scripts. For details, see How to Use Context Parameters in HTTP(S) Requests.
URL
Enter the URL that you wish to test and specify the HTTP method that will be used
The address should be formed exactly as you would use it in a browser, such as https://www.example.com. You must include the https:// or https:// at the beginning of the address. You may include any GET parameters at the end of your URL.
Request Type
You can select one of the most-commonly-used HTTP methods to send monitoring requests to a web page. If you need to send a payload with HTTP requests, provide it in the corresponding field (see the Request Body chapter for details). The payload can be specified and sent with all types of requests except Trace (RFC2616).
Flag as Error Responses That Exceed
This setting specifies the maximum time, in seconds, that the system will wait for a response from the target resource. If the response is not received within the defined time, the system flags it as an error.
Expected response codes
You can provide response codes to indicate which HTTP response codes to expect in your load tests. If the actual response code does not match the expected one, the system will automatically log an error. See details in Configuring Expected HTTP Status Codes.
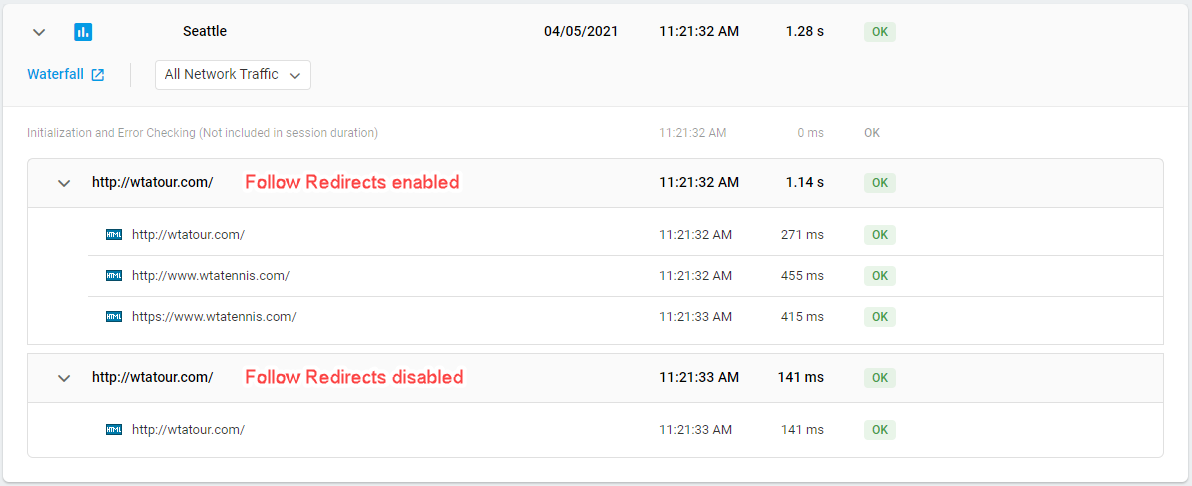
URL Redirects
If the Follow Redirects option is set to Yes, the system will follow the path of the URL that is sent with the 301 response and consider each redirect as a separate HTTP request. It enables you to follow the full redirect chain (all the links the request is redirected through) in the test results, including response times both for the initial URL and subsequent responses.
We recommend that you leave the Follow Redirects option activated if you need to test not only the initial URL, but all the URLs in the chain. For example, it can be useful to perform an SSL certificate check for each URL in a redirect chain.
In cases where you want to test an initial URL only, disable the Follow Redirects option.
User Behaviour Profile
The User Behavior Profile controls how the system emulates user interactions during a test. For instance, using minimal delays runs the test at maximum speed, which helps identify performance limits under stress conditions. You can adjust the profile settings to match your specific testing needs. For more details, see User Behavior Profile.
SSL/Certificate Check
Secure Socket Layer SSL Certificate Check includes the following validation options:
- Authority: verifies whether a certificate chain contains a root certificate that is trusted, or not trusted.
- Common Name (CN): validates that an address you navigate to matches the address certificate the address was signed to.
- Date: verifies the certificate expiration date.
- Revocation: validates that the certificate’s chain of trust doesn’t contain a revoked certificate.
- Usage: verifies a certificate chain for the improper use of an intermediate certificate.
- Expiration Reminder in Days: a reminder that notifies (as an error) about certificate expiration.
- Client Certificate: client certificate name.
Content Validation
Content Validation Keywords are used to ensure that specific text or elements are present within the HTML source code of a web page. To select right keywords for web page content validation, access the webpage’s source code and choose the keywords or phrases that uniquely represent the content.
If you see text on a webpage in your browser but can’t find it in the HTML source code, the text might not be directly included in the raw HTML but dynamically generated by JavaScript, loaded from external APIs or embedded in IFrames. If you want to use this type of text in web page content validation, configure a Single Web Page device to set up performance monitoring in a real browser window.
In the Keyword fields, you can specify one or more words or phrases that you wish to search for in the HTML source code of the target web page. If the expected keywords are not found, the task will return an error.
You can enter multiple strings into the keyword fields. The values can be separated by logical expressions:
{[("keyword1"&"keyword2")|!"keyword3"]}
Where:
{[ – keyword expression start;
]} – keyword expression end;
() – grouping brackets;
& – logical AND;
| – logical OR;
! – logical NOT;
“string” – a keyword.
A successful keyword expression must include the start and end brackets as follows:
{["keyword"]}
Authorization
The HTTP authentication protocol is used to allow users to access content on some websites.
The following authentication schemes are available:
- Basic Authentication: This method encodes the username and password in base64 and sends them in the request header. It’s simple but not secure unless used with HTTPS. For more details, see Basic Authentication.
- Digest Authentication: This scheme hashes credentials using a nonce (a random value) before sending them over the network, providing better security than Basic Authentication by preventing replay attacks.
- NTLM Authentication: A challenge-response mechanism developed by Microsoft, NTLM is used for securing credentials in Windows environments. It provides strong security by using multiple hashing and challenge-response protocols.
Once provided, login credentials will be passed along with the request header to the web server.
- Username: contains a username for HTTP/S authentication.
- User Password: contains a password for HTTP/S authentication.
Headers
The option enables adding any additional custom headers. For example, you can define the MIME type of the data sent along with the request in the Content-Type header:
Content-Type: text/html
If the Content-Type header is not specified for the request, the request will be sent with the default content type application/x-www-form-urlencoded.
The DNS Options feature allows users to choose how domain name server (DNS) requests are conducted during a test.
The Custom DNS Hosts section allows setting up the mapping of IP addresses to hostnames. IPv6 and IPv4 DNS resolutions are supported.
To specify the mapping, enter the IP address and the hostname in the corresponding fields.
See also: DNS Mode Options.
Note that the option is not supported by LoadView On-site Agents. To find detailed guidelines on how to set up custom DNS hosts for On-site Agent, visit the How to Set Up Custom DNS Hosts for Load Testing with On-site Agent article of our Knowledge Base.
Request Body
Dotcom-Monitor allows you to send payloads in HTTP(S) requests (except for TRACE requests). The HTTP request body can be sent either as raw data (JSON, XML, etc.) or as a static name-value collection (Form Data).
To work with a name-value collection, enable Detailed mode using the switcher at the top of the section and provide parameter names and values in the corresponding fields.
To send raw data, such as a JSON object, enter your payload directly into the input field. You can also dynamically modify the request body — for example, by including the current date and time in a POST request or passing a session ID within a JSON payload. Dotcom-Monitor supports dynamic HTTP request payloads through Razor syntax and data masks.
-
Example. Dynamic JSON Body for HTTP Post Requests
To better understand how Dynamic JSON body works in the HTTP request, let’s have a look at the following example. Suppose we need to submit an order on a website and the submission transaction includes three basic steps executed sequentially:
- Login
- Check-in
- Order Submission
To set up a test with these steps executed sequentially, we need to create three HTTP tasks within one monitoring device (or load test, if load testing is taking place).
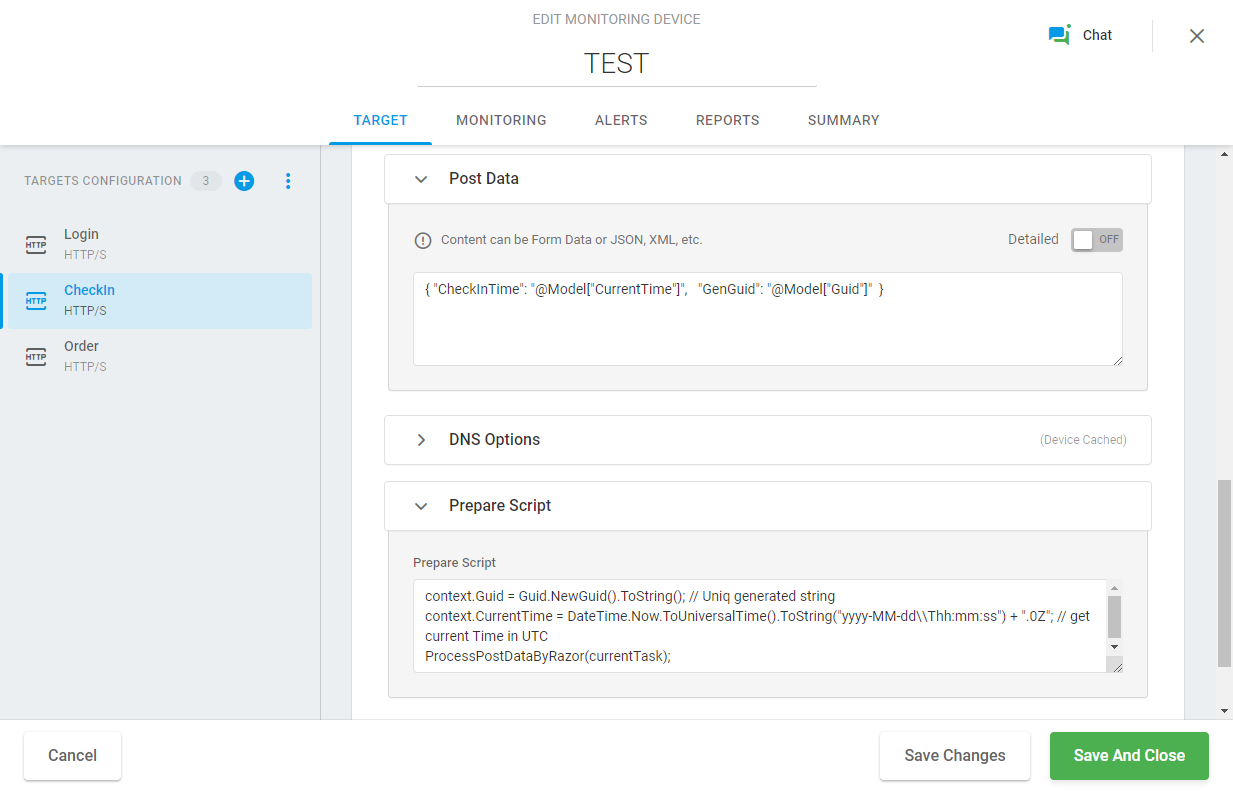
Let’s assume that we need to send the current time and a unique GUID in the JSON with the HTTP request to check in with the application. Also, to submit an order, a user session ID generated upon login and an order time is required by the application.
To implement this test, we first need to configure a login request with basic authentication parameters to the web application web server. Next, we need to configure an HTTP request to pass the actual check-in time and unique GUID along with a JSON body. For this example, we will enter the following string using the Razor syntax under the request Body tab (former Post Data):
{ "CheckInTime": "@Model["CurrentTime"]", "GenGuid": "@Model["Guid"]" }Where @Model[“<Parameter Name>”] references a necessary context parameter name in the Razor expression.
We must declare the context parameters and specify how the Body data should be processed under the Script tab in the Prepare Script field:
context.Guid = Guid.NewGuid().ToString(); // uniq random string
context.CurrentTime = DateTime.Now.ToUniversalTime().ToString("yyyy-MM-dd\\Thh:mm:ss") + ".0Z"; // get current time in UTC
ProcessPostDataByRazor(currentTask); // the call to process the Post Data content with the Razor engine
The HTTP request will look similar to this:
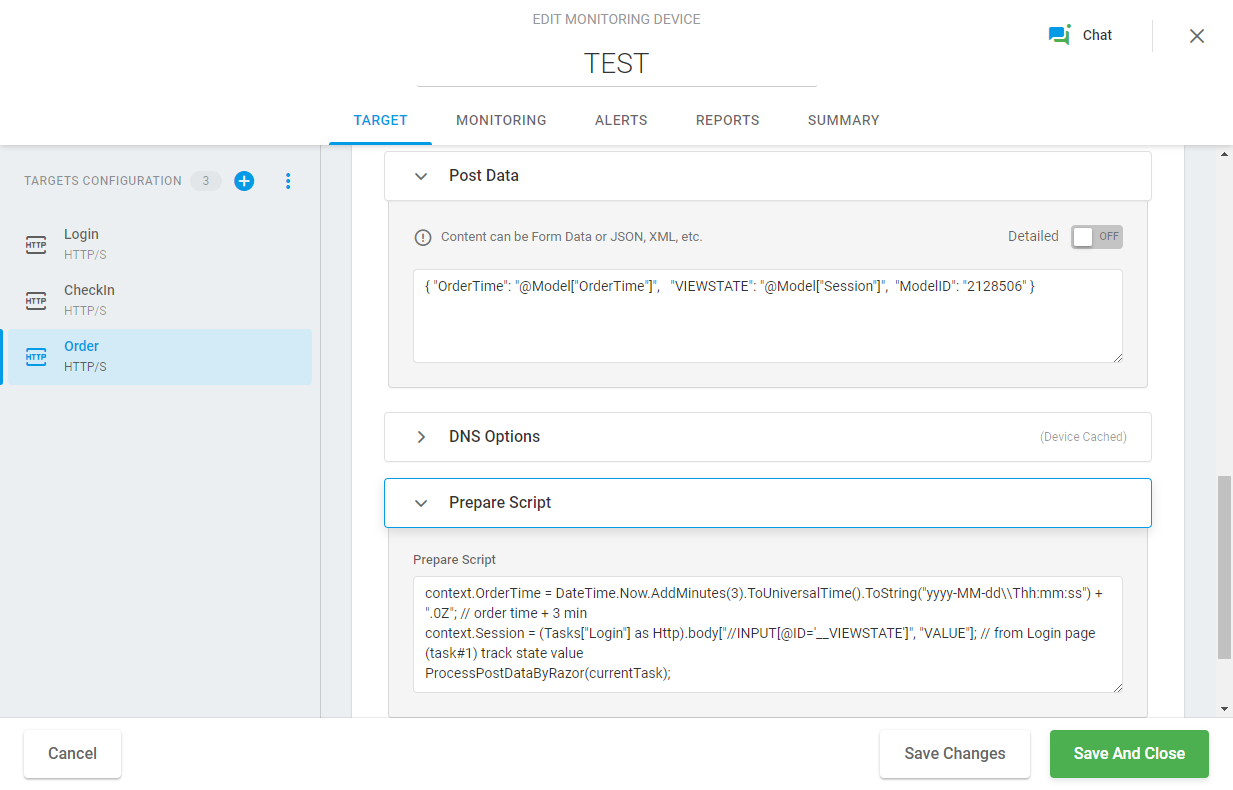
03:15:23
POST https://www.dotcom-monitor.com/CheckIn
{ "CheckInTime": "2021-03-30T08:15:22.0Z", "GenGuid": "5c5e3d23-66fd-49d0-bd57-62c516aea7e7" }
In the next step, we need to configure the HTTP request to submit an order. In order to do this, we will pass the order current time and session ID, along with the item’s model identification number, in the JSON body to the target endpoint. See the JSON body for this request below:
{ "OrderTime": "@Model["OrderTime"]", "VIEWSTATE": "@Model["Session"]", "ModelID": "2128506" }To pass a value of the current session ID variable, we need to retrieve it from the login page, called at the first login step, using the View State method. It can be coded in the prepare script. Additionally, to simulate a real user’s think time, we will set the order time variable with a three minute offset. Therefore, the Prepare Script field will contain the following strings:
context.OrderTime = DateTime.Now.AddMinutes(3).ToUniversalTime().ToString("yyyy-MM-dd\\Thh:mm:ss") + ".0Z"; // order time + 3 min
context.Session = (Tasks["Login"] as Http).body["//INPUT[@ID='__VIEWSTATE']", "VALUE"]; // track state value from Login page
ProcessPostDataByRazor(currentTask);
The resulting HTTP request will look similar to this:
03:15:45
POST https://www.dotcom-monitor.com/Order
{ "OrderTime": "2021-03-30T08:18:45.0Z", "VIEWSTATE": "<Server Generated ViewState>", "ModelID": "2128506" }
To learn how to configure an HTTP request with a dynamically changing payload, see How to Dynamically Change Payload in HTTP Request.
Prepare and Post Scripts
The fields can contain C# code, which can be used for specific POST, GET, URL data or for validating or publishing custom headers. Please see the Using Prepare Script and Post Script article or contact technical support for more details on usage.
Ignore Errors
If you want to ignore an error with a specific code and type while testing, you can configure the Ignore Error Codes option in the test target settings. If the system detects a response with the specified error type and code, the response will be considered as successful and its status will be changed to OK. Note that ignored errors will not be reflected on the reports and can’t be tracked down.
You can find a comprehensive list of Error Codes in the HTTP Status Codes List | HTTP Error Codes Explained article of this wiki.