
Download the On-Prem Load Injector Installer on a dedicated Windows Server inside your local network.
System Requirements
The following requirements are fundamental and essential for the proper functioning of On-Prem Load Injectors. While these cover the basics, it’s important to note that certain aspects may be intricately tied to specific security policies on the client’s side. These individual nuances will be addressed on a case-by-case basis through technical support requests, as they pertain to client-specific security considerations. For troubleshooting, see On-Site Proxy Agent and On-Prem Load Injector Troubleshooting.
Hardware requirements
- 2-core CPU or higher
- 16 GB RAM
- 2 GB Hard Drive space
Software prerequisites
- On-Prem Add-on enabled in your LoadView account
- Administrative Access for installation and execution
- .NET Framework 4.7.2 or higher
- OS Windows Server 2016 or higher x 64bit
- Chrome (latest release) or Edge (latest release) for On-Prem Agent registration only
- Windows Media Player (for Streaming Media tasks only)
- The Remote Desktop service is enabled on the machine. The service allows browsers to run load tests and interact with websites as real users would, all via a secure connection over port 443. Please note that LoadView does not require any inbound connection to the servers that run On-Prem Load Injectors.
- The Always Prompt for Password group policy is set to Not Configured or Is Disabled
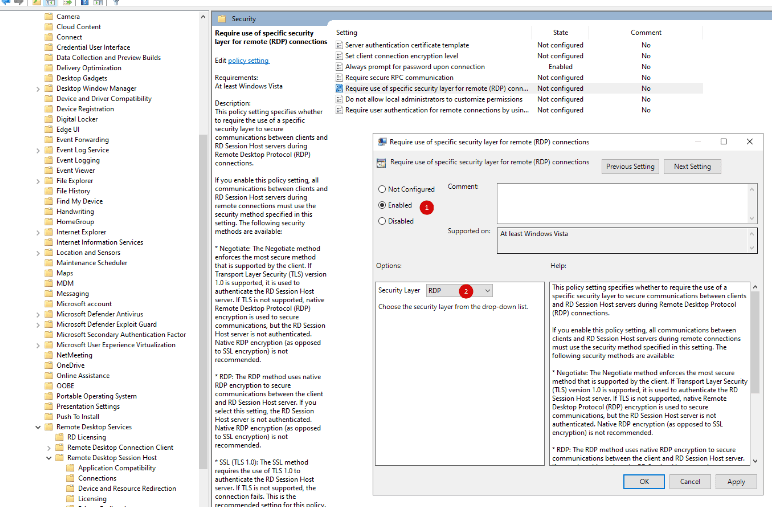
To login to RDP services, On-Prem Load Injector requires the Always Prompt for Password group policy to be set to Not Configured or Is Disabled. You can check the policy settings in your Group Policy Editor, Computer Configuration > Administrative Templates > Windows Components > Remote Desktop Services > Remote Desktop Session Host > Security.
If the setting is enabled and your policy requires enforcing a password prompt for users logging on to Remote Desktop Services, please follow the recommendations below to grant On-Prem Load Injector the ability to remotely access the computer:
1. Enable Remote Desktop on your computer.
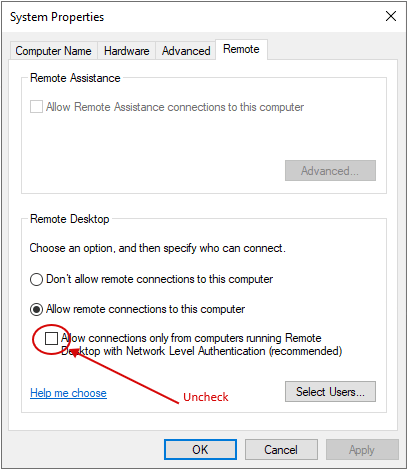
2. Enable the Require use of specific security layer for remote (RDP) connections policy as shown below.
Outbound traffic requirements
| Outgoing Traffic Requirement | ||
| On-Site Proxy Agent Operation
(Use either of the listed options) |
IP Range (Recommended) |
|
| Host |
|
|
| URL |
|
|
| Component Downloads | To allow the app to download additional required components, please make sure to whitelist the following host:
d11evr0n7mmusc.cloudfront.net |
|
Installation Using The Setup Wizard
Configuring On-Prem Load Injector in LoadView
To connect an On-Prem Load Injector installed on your server to LoadView, first you need to create and configure an injector instance in your LoadView account:
- Login into your LoadView account and go to Manage > On-Prem Load Injectors
- Click New Injector on the On-Prem Load Injectors screen.
- Give a unique name to the injector, provide a region and a description.
- If you want to limit payload for load testing in real browsers (Web app/ Web page load test), set the Maximum Load Injector Payload for Real Browser Testing parameter.
- Save changes. The injector name will appear in the list of On-Prem Load Injectors.
Installing On-Prem Load Injector
To install On-Prem Load Injectors on your server, follow the steps provided below:
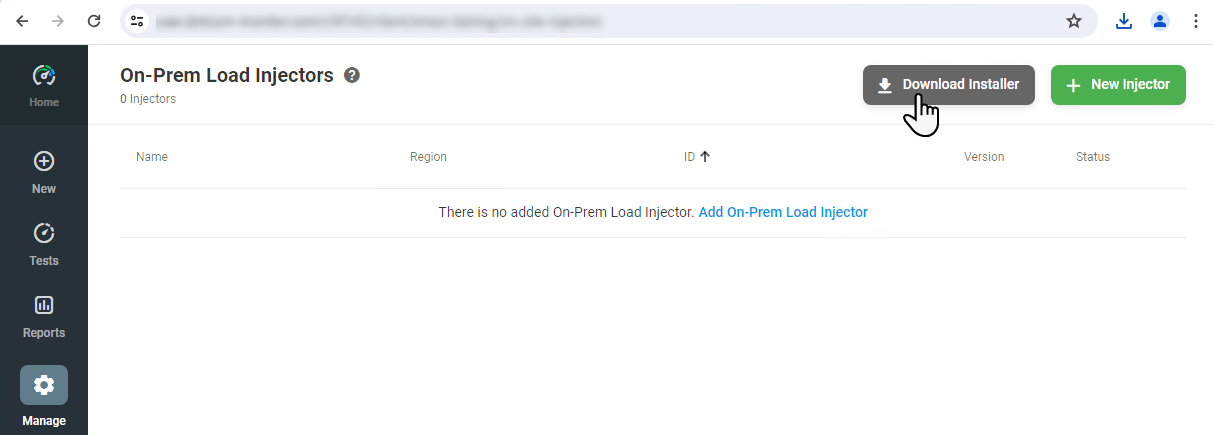
1. From Manage > On-Prem Load Injectors, click Download Installer.
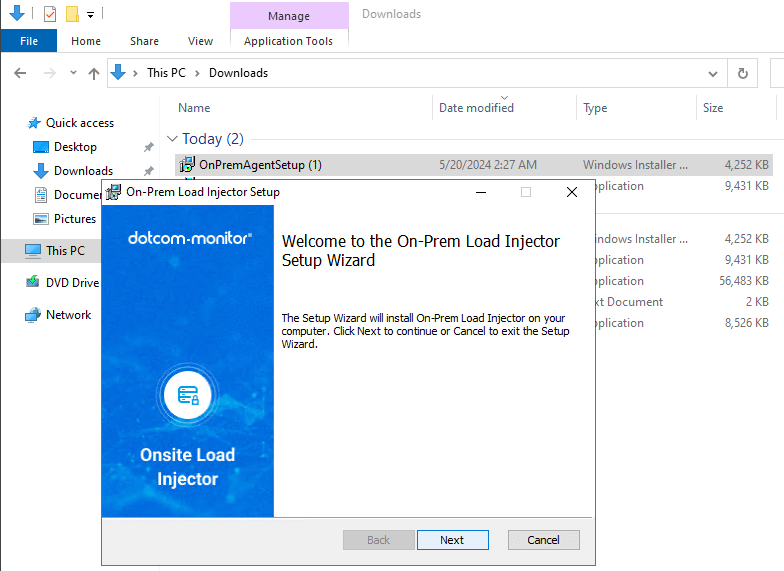
3. Run the installer and follow the steps of the On-Prem setup wizard.
4. Finish On-Prem Load Injector setup and register the injector by logging in into your Dotcom-Monitor account. Registrator runs several prerequisite checks before registering the On-Prem Agent service with LoadView. If any prerequisite checks failed, please consult the On-Prem Agent Troubleshooting article for troubleshooting.
5. To connect the injector to your account, once logged in successfully, select an injector name from the list of the On-Prem Injectors created in your LoadView account.

Silent Install
The On-Prem Load Injector supports command-line installation, allowing for a seamless setup process. During the installation, a new On-Prem Load Injector instance is automatically created, configured in your LoadView account, and connected to the injector on your server. By following the instructions in this section, you can efficiently deploy the On-Prem Load Injector in enterprise environments without manual intervention.
Copy the Installation Command
- On your server, run Command Prompt (cmd) as Administrator.
- Copy and past the following command in your command line:
OnPremAgentSetup.msi REGISTRATORCMD="-autoinstall -authtoken=<UID>" /qn
Create Your Auth Token
To proceed with the installation, you need to replace ‘<UID>‘ in the -authtoken parameter with your actual authentication token. To do this:
- Log in to the LoadView account.
- In LoadView, create an integration UID, which will be used as your auth token, under Manage> Integrations > New Integration > Load Testing Web API.
- Click Create Integration and copy the Load Testing Web API Unique Identifier from the Integration UIDs list.
- Replace ‘<UID>‘ in the command with the Unique Identifier you just copied. Your command should look like on the example below.

Run the Command
Press Enter to run the command. The installation process will begin and the agent will be automatically registered in LoadView.
Custom On-Prem Load Injector Configuration & Proxy Settings
If you want to use proxy in load testing and specify custom On-Prem Load Injector settings upon registration in LoadView, to the command line, add the – configfile parameter followed by a config file path :
OnPremAgentSetup.msi REGISTRATORCMD="-autoinstall -authtoken=8E0999933D6474EBC91BC596B92B2EE -configfile=<ConfigFilePath>.config" /qn
Replace ‘<ConfigFilePath>‘ in the -configfile parameter with a full path to the config file. Use the template below to create your On-Prem Load Injector configuration file.
Centralized Installation
Centralized installation of On-Prem Agent across multiple servers can be implemented with various group deployment tools. As an example, you can use our lightweight PowerShell script for installing the agent on specific servers within the Active Directory domain.
Note that the script must be run with an account that has administrator rights on the servers on which you want to install the agent.
param ([Parameter(ValueFromRemainingArguments=$true)][String[]]$servers)

$script =
    {
    $fullPathToInstaller = $env:TEMP + "\OnPremAgentSetup.msi"
    start-process $fullPathToInstaller -ArgumentList 'REGISTRATORCMD=" -autoinstall -authtoken=8E049B6B64D6474EBC91BC596B92B2EE" /log OnPremLog.txt /qn' -Wait
    }

$installerFileName = "OnPremAgentSetup.msi"
$fullPathToInstaller = $PSScriptRoot + "\" + "$installerFileName"

foreach ($s in $servers)
{
$s
$tempFolder = Invoke-Command -ComputerName $s -ScriptBlock {$env:TEMP}
$DestComputerSession = New-PSSession -ComputerName $s
Copy-Item $fullPathToInstaller -Destination $tempFolder -ToSession $DestComputerSession -Force
Invoke-Command -ScriptBlock $script -Session $DestComputerSession
Remove-PSSession -Session $DestComputerSession
}
Enabling On-Prem Regions For Departments
If you have Departments under your LoadView parent account, you can allow departments to run load tests using On-Prem regions.
To enable access to specific On-Prem regions and set a limit on the number of on-premises load tests for a department, go to your Account settings > Departments and configure the corresponding settings in the Load Testing Limits section.