
Load Test with Load Step Curve allows you to check the response time of your website by gradually changing the number of concurrent users during a predefined time duration.
How it works
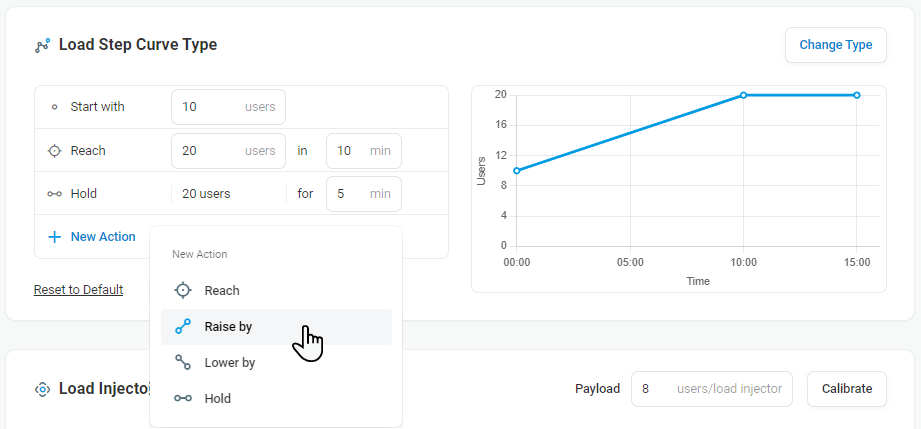
Based on the starting number of concurrent visitors and their arrival/departure rates, LoadView creates the load curve. The chart on the page updates as you make changes and gives you a visual representation of the load to the device and how it will change over the course of the test.
Configuring a Load Step Curve
To verify if the device is configured properly and the website can handle the minimum load, you can use the default scenario steps to run a verification test. Based on the verification test results, you may need to adjust your device settings before running the test with a higher load.
To set up your custom execution plan, change the presets in the plan fields according to your goal (e.g., the number of simultaneous users you are expecting to have on your website).
To add a new custom step, click the New Action button in the curve setup section and select a step type. The following steps are available:
- Start with – the starting user load. It could take some time to simulate the starting number of users.
- Raise by – load ramp-up rate. The number of users is increased by this value each minute during the specified time.
- Reach – the specified number of users is reached in a set period of time.
- Hold for – load duration. The load reached on the previous step remains constant within the specified time.
- Lower by – load ramp-down rate. The number of users is reduced by this value each minute during the specified time.
To delete a step, point to the end of the related line and click the remove icon.
Once the Load Step Curve is configured, proceed with Payload and Geo Distribution configuration as described in Getting started with Load Test Setup.
When the test is finished, you can view test results on the Test Report page. Also, it is recommended to check the session log for errors detected.